How to build a simplistic flutter calculator app for iOS and Android
Let’s create a flutter calculator.
In this lesson, We are going to build a simple calculator using the Flutter framework.
Create a new Flutter Android Studio Project like Hello,World.
Delete all the code of main.dart

Let’s start with our stater code
Firstly, you need a template code that includes basic instructions for creating a stateful app.
main.dart
import 'package:flutter/material.dart';
// Starter code for flutter calculator
void main() => runApp(MyApp());

class MyApp extends StatelessWidget
{
  @override
  Widget build(BuildContext context) {
    // TODO: implement build
    return MaterialApp(home: MyHomeApp(),);
  }
}
class MyHomeApp extends StatefulWidget
{
  _MyHomeAppState createState() => _MyHomeAppState();
}

class _MyHomeAppState extends State<MyHomeApp>
{
  @override
  Widget build(BuildContext context) {
    return Scaffold(
        appBar: AppBar(
        title: Text('Simplistic calculator'),
    ),
    );
  }
}

Let’s declare two TextEditingControllers for operating the input values from users.
The _value1Controller for first TextField and _value2Controller for second TextField. _message variable will store the output of the calculation.
_value1Controller and _value2Controller to refer to instances of the TextEditingController class.
Secondly, Let’s add the following instructions in the _MyHomeAppState class.
late TextEditingController _value1Controller, _value2Controller;
late String _message;
Let’s override the initState() and initialise our variables.
@override
void initState() {
  super.initState();
  _message = "0.00";
  _value1Controller = TextEditingController();
  _value2Controller = TextEditingController();
}
When you initialise _value1Controller = TextEditingController(); and _value2Controller = TextEditingController(); _MyHomeAppState, makes two
TextEditingController objects.
main.dart
import 'package:flutter/material.dart';
// Starter code for flutter calculator
void main() => runApp(MyApp());

class MyApp extends StatelessWidget
{
  @override
  Widget build(BuildContext context) {
    // TODO: implement build
    return MaterialApp(home: MyHomeApp(),);
  }
}
class MyHomeApp extends StatefulWidget
{
  _MyHomeAppState createState() => _MyHomeAppState();
}

class _MyHomeAppState extends State<MyHomeApp>
{

  late TextEditingController _value1Controller, _value2Controller;
  late String _message;

  @override
  void initState() {
    super.initState();
    _message = "0.00";
    _value1Controller = TextEditingController();
    _value2Controller = TextEditingController();
  }


  @override
  Widget build(BuildContext context) {
    return Scaffold(
        appBar: AppBar(
        title: Text('Simplistic calculator'),
    ),
    );
  }
}
It’s time to build our text fields for entering numbers. Let’s create two custom text fields that will use our controllers. (_value1Controller and _value2Controller )

Widget _buildValue1TextField() {
  return Container(
    padding: EdgeInsets.symmetric(horizontal: 8.0, vertical: 4.0),
    child: TextField(
      controller: _value1Controller,
      decoration: InputDecoration(labelText: 'Enter a number'),
      keyboardType: TextInputType.number,
    ),
  );
}
Widget _buildValue2TextField() {
  return Container(
    padding: EdgeInsets.symmetric(horizontal: 8.0, vertical: 4.0),
    child: TextField(
      controller: _value2Controller,
      decoration: InputDecoration(labelText: 'Enter a number'),
      keyboardType: TextInputType.number,
    ),
  );
}
Let’s override dispose()
The flutter framework disposes of _MyHomeAppState instance. Finally it calls each controller’s own dispose method.
@override
void dispose() {
  // TODO: implement dispose
  super.dispose();
  _value1Controller.dispose();
  _value2Controller.dispose();
}
main.dart
import 'package:flutter/material.dart';
// Starter code for flutter calculator
void main() => runApp(MyApp());

class MyApp extends StatelessWidget
{
  @override
  Widget build(BuildContext context) {
    // TODO: implement build
    return MaterialApp(home: MyHomeApp(),);
  }
}
class MyHomeApp extends StatefulWidget
{
  _MyHomeAppState createState() => _MyHomeAppState();
}

class _MyHomeAppState extends State<MyHomeApp>
{

  late TextEditingController _value1Controller, _value2Controller;
  late String _message;

  @override
  void initState() {
    super.initState();
    _message = "0.00";
    _value1Controller = TextEditingController();
    _value2Controller = TextEditingController();
  }
  Widget _buildValue1TextField() {
    return Container(
      padding: EdgeInsets.symmetric(horizontal: 8.0, vertical: 4.0),
      child: TextField(
        controller: _value1Controller,
        decoration: InputDecoration(labelText: 'Enter a number'),
        keyboardType: TextInputType.number,
      ),
    );
  }

  Widget _buildValue2TextField() {
    return Container(
      padding: EdgeInsets.symmetric(horizontal: 8.0, vertical: 4.0),
      child: TextField(
        controller: _value2Controller,
        decoration: InputDecoration(labelText: 'Enter a number'),
        keyboardType: TextInputType.number,
      ),
    );
  }


  @override
  void dispose() {
    // TODO: implement dispose
    super.dispose();
    _value1Controller.dispose();
    _value2Controller.dispose();
  }


  @override
  Widget build(BuildContext context) {
    return Scaffold(
        appBar: AppBar(
        title: Text('Simplistic calculator'),
    ),
    );
  }


}
We need a method for calculation so, Let’s create a method for mathematical operations
_calcUpdate()
void _calcUpdate(String opr) {
  setState(() {
    final double value1 = double.parse(_value1Controller.text);
    final double value2 = double.parse(_value2Controller.text);
    switch(opr){
      case "+" :  {
        _message = (value1 + value2).toString();
      } break;
      case "-" : {
        _message = (value1 - value2).toString();
      } break;
      case "*" : {
        _message = (value1 * value2).toString();
      } break;
      case "/" : {
        _message = (value1 / value2).toString();
      } break;
    }

  });
}
Now let’s compose our app’s UI and call appropriate methods to our UI. Let’s use some common flutter widgets
 Padding(
  padding: const EdgeInsets.all(10.0),
  child: Column(
    mainAxisAlignment: MainAxisAlignment.spaceEvenly,
    children: [
      Align(
          alignment: Alignment.bottomRight,
          child: Text("$_message", style: TextStyle(fontSize: 40, ),)
      ),
      Divider(height: 4, color: Colors.grey, thickness: 5, ),
      _buildValue1TextField(),
      _buildValue2TextField(),
     Row(
       mainAxisAlignment: MainAxisAlignment.spaceAround,
       children: [
         ElevatedButton(onPressed: () {
           _calcUpdate("+");
           }, child: Text("+")),

         ElevatedButton(onPressed: () {
           _calcUpdate("-");
         }, child: Text("-")),

         ElevatedButton(onPressed: () {
           _calcUpdate("*");
         }, child: Text("*", style: TextStyle(fontSize: 20,),)),

         ElevatedButton(onPressed: () {
           _calcUpdate("/");
         }, child: Text("/", style: TextStyle(fontSize: 20,),)),

       ],
     )

    ],
  ),
),
Overview of method/function calls
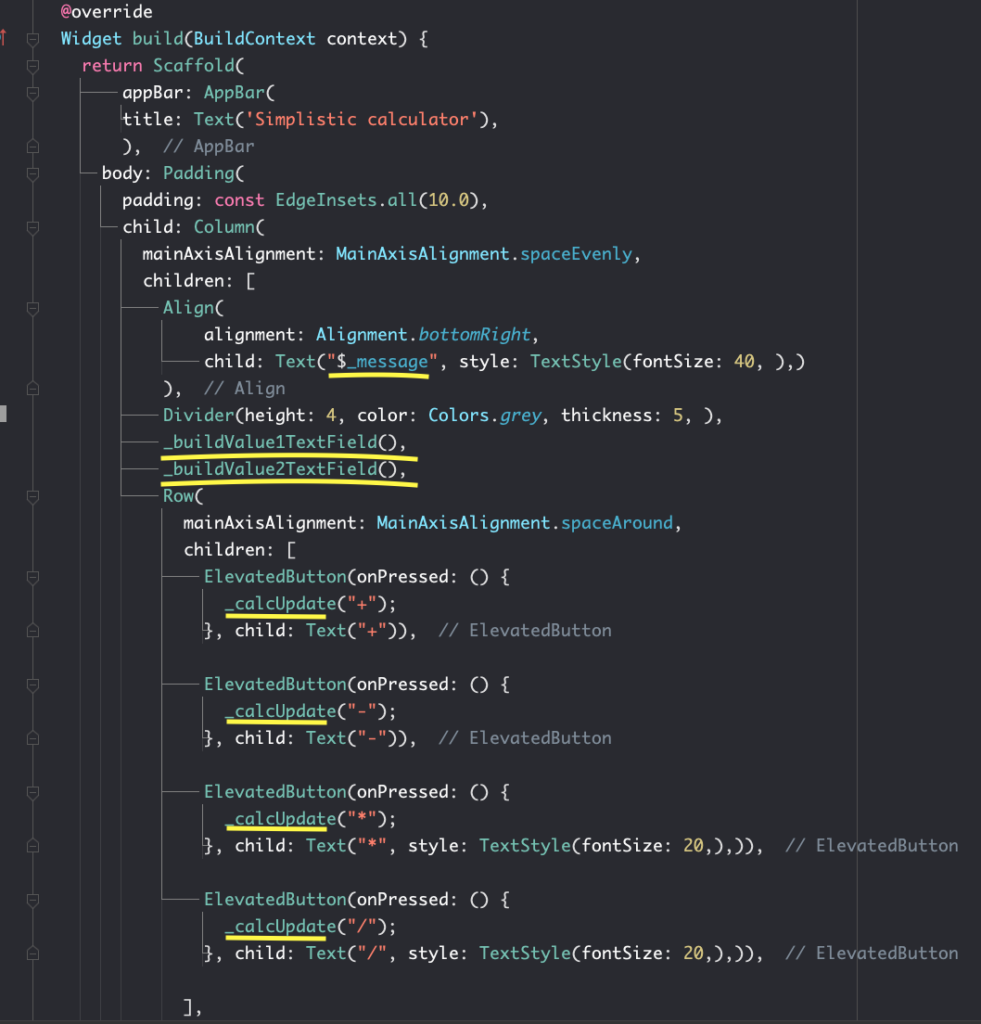
Complete code of Flutter Calculator
main.dart
import 'package:flutter/material.dart';

void main() => runApp(MyApp());

class MyApp extends StatelessWidget
{
  @override
  Widget build(BuildContext context) {
    // TODO: implement build
    return MaterialApp(home: MyHomeApp(),);
  }
}
class MyHomeApp extends StatefulWidget
{
  _MyHomeAppState createState() => _MyHomeAppState();
}

class _MyHomeAppState extends State<MyHomeApp>
{

  late TextEditingController _value1Controller, _value2Controller;
  late String _message;

  @override
  void initState() {
    super.initState();
    _message = "0.00";
    _value1Controller = TextEditingController();
    _value2Controller = TextEditingController();
  }
  Widget _buildValue1TextField() {
    return Container(
      padding: EdgeInsets.symmetric(horizontal: 8.0, vertical: 4.0),
      child: TextField(
        controller: _value1Controller,
        decoration: InputDecoration(labelText: 'Enter a number'),
        keyboardType: TextInputType.number,
      ),
    );
  }

  Widget _buildValue2TextField() {
    return Container(
      padding: EdgeInsets.symmetric(horizontal: 8.0, vertical: 4.0),
      child: TextField(
        controller: _value2Controller,
        decoration: InputDecoration(labelText: 'Enter a number'),
        keyboardType: TextInputType.number,
      ),
    );
  }


  @override
  void dispose() {
    // TODO: implement dispose
    super.dispose();
    _value1Controller.dispose();
    _value2Controller.dispose();
  }

  void _calcUpdate(String opr) {
    setState(() {
      final double value1 = double.parse(_value1Controller.text);
      final double value2 = double.parse(_value2Controller.text);
      switch(opr){
        case "+" :  {
          _message = (value1 + value2).toString();
        } break;
        case "-" : {
          _message = (value1 - value2).toString();
        } break;
        case "*" : {
          _message = (value1 * value2).toString();
        } break;
        case "/" : {
          _message = (value1 / value2).toString();
        } break;
      }

    });
  }


  @override
  Widget build(BuildContext context) {
    return Scaffold(
        appBar: AppBar(
        title: Text('Simplistic calculator'),
        ),
      body: Padding(
        padding: const EdgeInsets.all(10.0),
        child: Column(
          mainAxisAlignment: MainAxisAlignment.spaceEvenly,
          children: [
            Align(
                alignment: Alignment.bottomRight,
                child: Text("$_message", style: TextStyle(fontSize: 40, ),)
            ),
            Divider(height: 4, color: Colors.grey, thickness: 5, ),
            _buildValue1TextField(),
            _buildValue2TextField(),
            Row(
              mainAxisAlignment: MainAxisAlignment.spaceAround,
              children: [
                ElevatedButton(onPressed: () {
                  _calcUpdate("+");
                }, child: Text("+")),

                ElevatedButton(onPressed: () {
                  _calcUpdate("-");
                }, child: Text("-")),

                ElevatedButton(onPressed: () {
                  _calcUpdate("*");
                }, child: Text("*", style: TextStyle(fontSize: 20,),)),

                ElevatedButton(onPressed: () {
                  _calcUpdate("/");
                }, child: Text("/", style: TextStyle(fontSize: 20,),)),

              ],
            )

          ],
        ),
      ),
    );
  }

}
Wow, Now you can see our simplistic flutter calculator. But you can make some changes to our UI if you need.
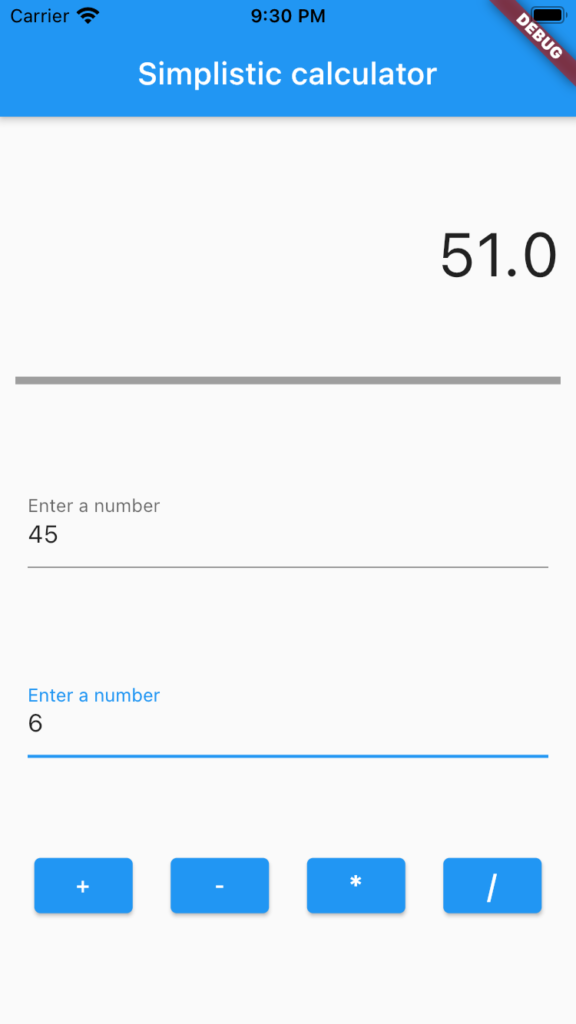
In conclusion, You can build any app using this procedure like Can you create an app for calculating the marks of a high school student. Why don’t you try the BMI calculator? (BMI = kg/m2)
