
Kotlin Android MVVM: A Modern Approach to Android Development
Kotlin Android MVVM offers a robust architecture for developing Android applications. This design pattern separates concerns, making your code more modular, testable, and maintainable. Let’s explore how you can leverage Kotlin Android MVVM to build scalable Android apps.

Why Choose Kotlin Android MVVM?
Kotlin Android MVVM (Model-View-ViewModel) stands out as an efficient way to structure Android apps. By separating the UI from the business logic, it ensures that your app is easier to manage and test. The model layer handles data operations, the view layer represents the UI, and the ViewModel acts as a bridge between them.
Android MVVM in Your Project
Getting started with Kotlin Android MVVM requires a clear understanding of each component’s role. First, create your data model, which will handle data operations like fetching data from APIs or databases. Next, set up your ViewModel, where you’ll place all your business logic and interact with the data model. Finally, design your UI components in the view layer, which will observe changes in the ViewModel and update the UI accordingly.
Sample Project Structure for MVVM
Model Layer
The Model layer handles the data logic of the application. It could involve network requests, database operations, or data manipulation.
WeatherData.kt
data class WeatherData(
    val temperature: Double,
    val humidity: Int,
    val condition: String
)
ViewModel Layer
The ViewModel handles the business logic and prepares the data for the UI. It communicates with the Model layer to fetch data and exposes it to the View layer via LiveData.
WeatherViewModel.kt
class WeatherViewModel : ViewModel() {

    private val _weatherData = MutableLiveData<WeatherData>()
    val weatherData: LiveData<WeatherData> get() = _weatherData

    fun fetchWeather() {
        // Simulate data fetching
        val data = WeatherData(temperature = 25.0, humidity = 60, condition = "Sunny")
        _weatherData.value = data
    }
}
View Layer
The View layer observes the data exposed by the ViewModel and updates the UI accordingly. It should not contain any business logic.
MainActivity.kt
class MainActivity : AppCompatActivity() {

    private lateinit var viewModel: WeatherViewModel

    override fun onCreate(savedInstanceState: Bundle?) {
        super.onCreate(savedInstanceState)
        setContentView(R.layout.activity_main)

        viewModel = ViewModelProvider(this).get(WeatherViewModel::class.java)

        val temperatureTextView: TextView = findViewById(R.id.temperatureTextView)
        val conditionTextView: TextView = findViewById(R.id.conditionTextView)

        viewModel.weatherData.observe(this, Observer { weather ->
            temperatureTextView.text = "${weather.temperature}°C"
            conditionTextView.text = weather.condition
        })

        viewModel.fetchWeather()
    }
}
Layout XML
The layout XML file defines the UI components that display the data.
activity_main.xml
<?xml version="1.0" encoding="utf-8"?>
<LinearLayout xmlns:android="http://schemas.android.com/apk/res/android"
    android:layout_width="match_parent"
    android:layout_height="match_parent"
    android:orientation="vertical"
    android:padding="16dp">

    <TextView
        android:id="@+id/temperatureTextView"
        android:layout_width="wrap_content"
        android:layout_height="wrap_content"
        android:text="Temperature"
        android:textSize="24sp" />

    <TextView
        android:id="@+id/conditionTextView"
        android:layout_width="wrap_content"
        android:layout_height="wrap_content"
        android:text="Condition"
        android:textSize="18sp" />
</LinearLayout>
Project Structure : Kotlin MVVM (Picture – Weather App)
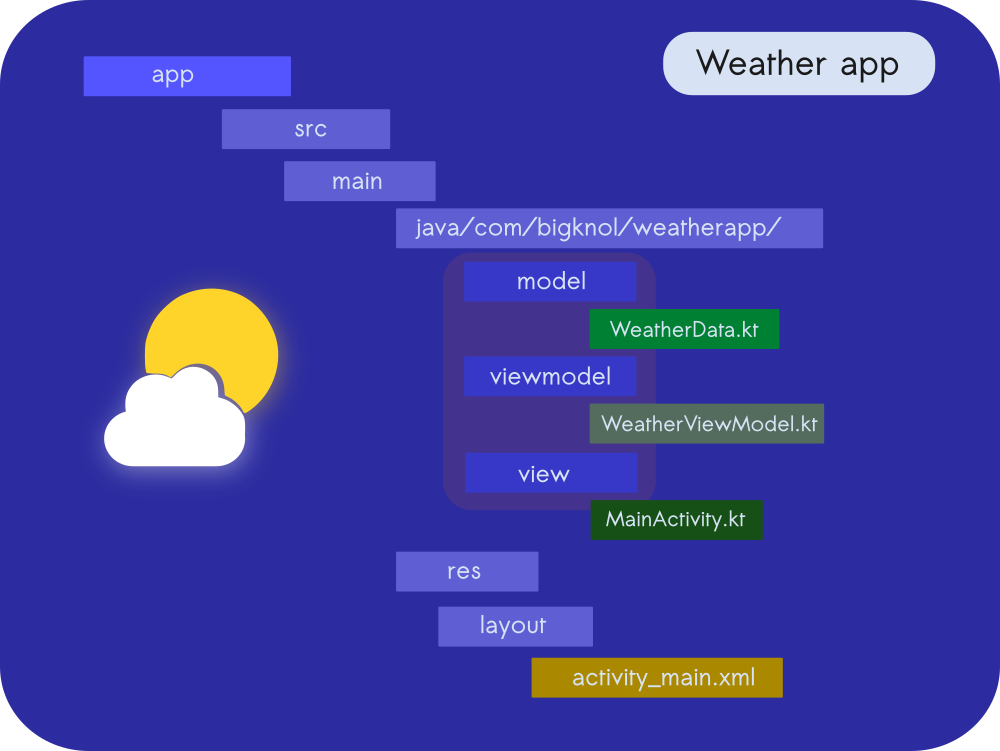
This structure provides a clear separation of concerns, allowing each part of the application to focus on its specific role, which is a key principle of the MVVM architecture.
Advantages of Using MVVM
One of the main advantages of MVVM is its support for data binding. This feature allows your UI components to automatically update when data changes, reducing the need for manual updates. Additionally, MVVM simplifies testing, as the business logic is decoupled from the UI, making it easier to write unit tests for your ViewModel.
Let’s walk through a practical example of implementing MVVM. Suppose you’re building a weather app. The model layer will handle API calls to fetch weather data. The ViewModel will process this data and prepare it for display. The view layer will observe the ViewModel and update the UI with the latest weather information.
First, avoid placing any business logic in your view layer. Instead, keep your views focused on rendering the UI. Second, ensure that your ViewModel does not directly reference the view, as this can lead to memory leaks. Finally, make use of LiveData to handle data changes and lifecycle events efficiently.
Final Thoughts
MVVM provides a clear and organized structure for developing Android apps. By separating concerns and leveraging data binding, this architecture makes your code more maintainable and testable. Start implementing MVVM in your projects to enhance the scalability and reliability of your apps.
Start implementing Kotlin Android MVVM in your projects to enhance the scalability and reliability of your apps.