Flutter AdMob Integration Tutorial: Banner Ad [New]
In this Flutter tutorial, we will learn how to integrate Flutter AdMob banner ad in your flutter project. Learn how to successfully monetize your Flutter projects. You can also try AdMob Interstitial ad in Flutter app.
AdMob is a mobile ad network developed by Google that allows developers to earn money by displaying advertisements in their mobile apps.
![Flutter AdMob Integration Tutorial: Banner Ad [2023]](https://bigknol.com/wp-content/uploads/2023/07/flutter_app_admob_integrate_android.png)
Let’s build a flutter admob demo app in Android Studio
Create a Flutter Project in Android Studio Flamingo
Create a new flutter project in Android Studio.

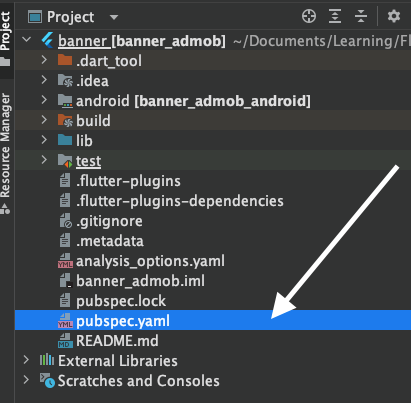
Please include the AdMob Google Mobile Ads dependency in the pubspec.yaml file.
Open it from your root project > pubspec.yaml
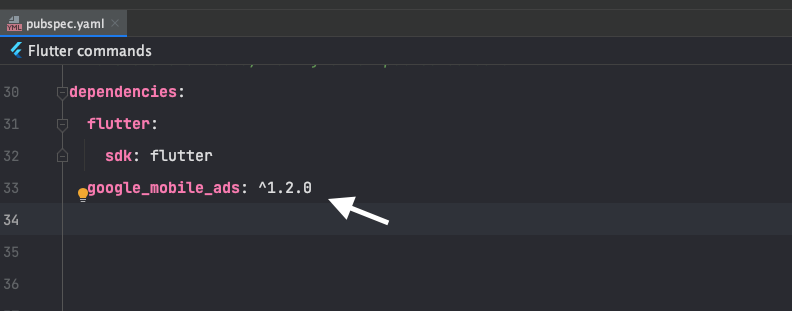
google_mobile_ads: ^1.2.0Incorporate the previously mentioned dependency to enable AdMob ads display in your Flutter application.
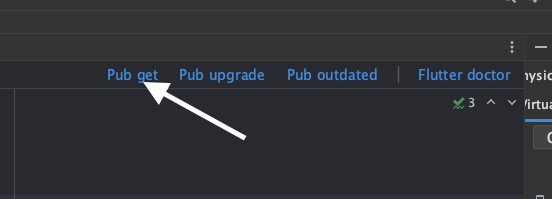
Click on the Pub get from top ‘Flutter Commands’
Navigate to the “lib” folder of your project. If you’re using Android Studio, it will automatically generate a sample project for you.
Open the “main.dart” file and remove all the code that was generated by Android Studio by default.
In this Flutter AdMob sample project, we will create two additional Dart files named “admob_helper.dart” and “main_content.dart.” These files will be used to handle AdMob integration and the main content of the application, respectively.
Flutter AdMob Helper Class
We will create a helper class called “AdMobHelper” to manage AdMob Banner IDs for both iOS and Android platforms.
Right click on lib folder > New > Dart file > admob_helper.dart

admob_helper.dart (Complete code)
import 'dart:io';
class AdMobHelper {
  static String get bannerUnitId{
    if(Platform.isAndroid)
      {
        return 'ca-app-pub-3940256099942544/6300978111';
      } else if(Platform.isIOS)
        {
          return 'ca-app-pub-3940256099942544/2934735716';
        }
    else{
      throw UnsupportedError("Platform does not support");
    }
  }
}
As mentioned, in this tutorial, we will utilize test IDs for both Android and iOS platforms.
How to get production ready App ID and Ad Unit Ids ? [Optional for this tutorial]
Step 1: Open and Sign in AdMob
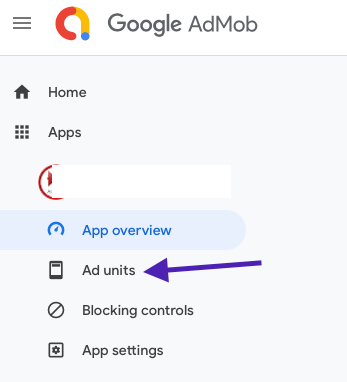
Please select the app in which you want to display the ads. Then, choose “Ad units” from the menu.

Next, you can choose ‘Banner’ from the list of options.
Finally hit on ‘Create ad unit’. It will generate Ad Unit ID (eg: ca-app-pub-3940256099942544/6300978111) and
App ID (eg. ca-app-pub-3940256099942544~3347511713) for your project.
Add App ID to Android Manifest File
Add the following meta tag under <application> in AndroidManifest.xml
[Your project > android > app > src > main > AndroidManifest.xml]
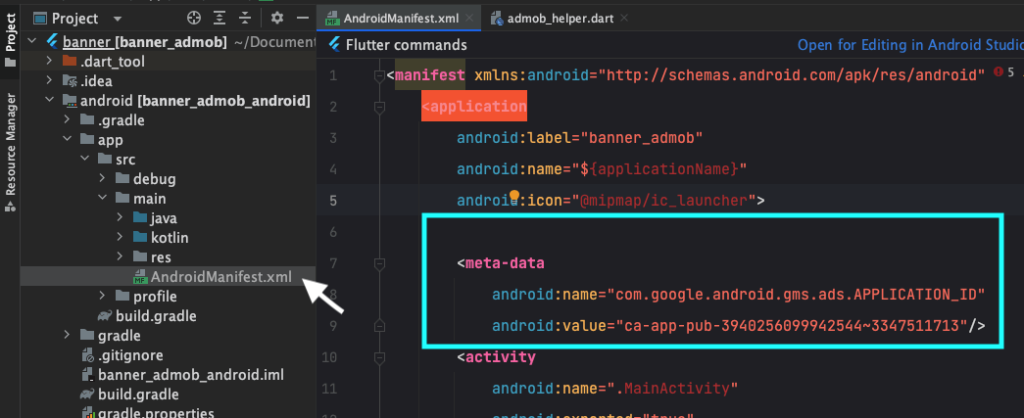
Feel free to substitute this “APPLICATION_ID” (App ID) with your own production-ready unit obtained from AdMob.
  <meta-data
            android:name="com.google.android.gms.ads.APPLICATION_ID"
            android:value="ca-app-pub-3940256099942544~3347511713"/>
Now time to close the AndroidManifest file. [No need to worry! If you encounter any errors, refrain from making changes on your end.]
Update App Target for Android
To integrate the Google Ads SDK, it’s essential to set the minSdkVersion to 19.
Open the build.gradle file [Your project > app > build.gradle ]
minSdkVersion flutter.minSdkVersionLet’s either replace or comment the above line from the “build.gradle” file.
Add the minimum SDK version to 19 like below :
defaultConfig {
  minSdkVersion 19

}
Let’s enable MultiDex in Flutter Android App:
Why do we need Mutlidex ?
Multidex stands for “Multiple Dex Files.” It is a mechanism used in Android applications to support projects with a large number of methods (64k method limit) in the Dalvik Executable (DEX) bytecode format.
In Flutter apps, you might encounter the need for Multidex when your project includes a large number of dependencies or code, leading to an overflow of the 64k method limit. If the total number of methods in your app exceeds this limit, it results in a build error.
Open the build.gradle file [Your project > app > build.gradle ]
Enable mutliDex as below:
 defaultConfig {

   multiDexEnabled true
}
Add the following dex dependency :
dependencies {
implementation "androidx.multidex:multidex:2.0.1"
}
Complete code of build.gradle :
def localProperties = new Properties()
def localPropertiesFile = rootProject.file('local.properties')
if (localPropertiesFile.exists()) {
    localPropertiesFile.withReader('UTF-8') { reader ->
        localProperties.load(reader)
    }
}

def flutterRoot = localProperties.getProperty('flutter.sdk')
if (flutterRoot == null) {
    throw new GradleException("Flutter SDK not found. Define location with flutter.sdk in the local.properties file.")
}

def flutterVersionCode = localProperties.getProperty('flutter.versionCode')
if (flutterVersionCode == null) {
    flutterVersionCode = '1'
}

def flutterVersionName = localProperties.getProperty('flutter.versionName')
if (flutterVersionName == null) {
    flutterVersionName = '1.0'
}

apply plugin: 'com.android.application'
apply plugin: 'kotlin-android'
apply from: "$flutterRoot/packages/flutter_tools/gradle/flutter.gradle"

android {
    namespace "com.example.banner_admob"
    compileSdkVersion flutter.compileSdkVersion
    ndkVersion flutter.ndkVersion

    compileOptions {
        sourceCompatibility JavaVersion.VERSION_1_8
        targetCompatibility JavaVersion.VERSION_1_8
    }

    kotlinOptions {
        jvmTarget = '1.8'
    }

    sourceSets {
        main.java.srcDirs += 'src/main/kotlin'
    }

    defaultConfig {
        // TODO: Specify your own unique Application ID (https://developer.android.com/studio/build/application-id.html).
        applicationId "com.example.banner_admob"
        // You can update the following values to match your application needs.
        // For more information, see: https://docs.flutter.dev/deployment/android#reviewing-the-gradle-build-configuration.
        //minSdkVersion flutter.minSdkVersion changes (1)
        minSdkVersion 19
        targetSdkVersion flutter.targetSdkVersion
        versionCode flutterVersionCode.toInteger()
        versionName flutterVersionName
        multiDexEnabled true // changes (2)
    }

    buildTypes {
        release {
            // TODO: Add your own signing config for the release build.
            // Signing with the debug keys for now, so `flutter run --release` works.
            signingConfig signingConfigs.debug
        }
    }
}

flutter {
    source '../..'
}

dependencies {
    implementation "org.jetbrains.kotlin:kotlin-stdlib-jdk7:$kotlin_version"

    // add dependencies changes (3)
    implementation "androidx.multidex:multidex:2.0.1"

}
main_content.dart
Create new dart file ‘main_content.dart’ where we place our flutter admob banner ad.
Let’s create a MainContent stateful widget as below:
class MainContent extends StatefulWidget {
  const MainContent({super.key});

  @override
  _MainContentState createState() => _MainContentState();
}
Let’s initialise the AdMob banner:
class _MainContentState extends State<MainContent> {
 BannerAd? _admobBannerAd;

}
Setup the Ad Unit ID using our AdMobHelper class. Finally make an ad request as below:
 void initState() {
    super.initState();
   BannerAd(
     adUnitId: AdMobHelper.bannerUnitId,
     request: const AdRequest(),
     size: AdSize.banner,
     listener: BannerAdListener(
       onAdLoaded: (ad) {
         setState(() {
           _admobBannerAd = ad as BannerAd;
         });
       },
       onAdFailedToLoad: (ads, error)
         {
           print("Failed to load ad ${error.message}");
           ads.dispose();
         },
     )
   ).load();

  }
Make sure that your AdMob banner is properly disposed and make it ready for next request.
  @override
  void dispose() {
     _admobBannerAd?.dispose();
     super.dispose();
  }
Let’s place our banner ad into our Stack of Scaffold.
if(_admobBannerAd != null)
              Align(alignment: Alignment.bottomCenter,
              child: Container(
                width: _admobBannerAd!.size.width.toDouble(),
                height: _admobBannerAd!.size.height.toDouble(),
                child: AdWidget(ad: _admobBannerAd!),
              ),
              ),
Complete code of main_content.dart
import 'package:flutter/material.dart';
import 'package:banner_admob/admob_helper.dart';
import 'package:google_mobile_ads/google_mobile_ads.dart';

class MainContent extends StatefulWidget {
  const MainContent({super.key});

  @override
  _MainContentState createState() => _MainContentState();
}

class _MainContentState extends State<MainContent> {

  BannerAd? _admobBannerAd;
  @override
  void initState() {
    super.initState();
   BannerAd(
     adUnitId: AdMobHelper.bannerUnitId,
     request: const AdRequest(),
     size: AdSize.banner,
     listener: BannerAdListener(
       onAdLoaded: (ad) {
         setState(() {
           _admobBannerAd = ad as BannerAd;
         });
       },
       onAdFailedToLoad: (ads, error)
         {
           print("Failed to load ad ${error.message}");
           ads.dispose();
         },
     )
   ).load();

  }

  @override
  void dispose() {
     _admobBannerAd?.dispose();
     super.dispose();
  }


  @override
  Widget build(BuildContext context) {
    return Scaffold(appBar: AppBar(title: const Text('Content')),
      body: SafeArea(
        child: Stack(
          children: [
            const Center(
              child: Column(
                children: [
               Text("App Main Content", style: TextStyle(fontSize: 17),)
                ],
              ),
            ),
            if(_admobBannerAd != null)
              Align(alignment: Alignment.bottomCenter,
              child: Container(
                width: _admobBannerAd!.size.width.toDouble(),
                height: _admobBannerAd!.size.height.toDouble(),
                child: AdWidget(ad: _admobBannerAd!),
              ),
              ),
          ],
        ),
      ),
    );
  }
}
Let’s create main.dart file (The entry point of the app)
main.dart
The app has a text and a button to navigate to the main content.
void main() {
  runApp(
          MaterialApp(
            title:  'AdMob Banner Ad Demo',
            initialRoute:  '/',
            routes: {
              '/' : (context) =>  MyApp(),
              '/main_content' : (context) =>  MainContent(),
            },
          )
      );
}
class MyApp extends StatelessWidget{
Widget build(BuildContext context) {
    // TODO: implement build
    return Scaffold(appBar: AppBar(title: const Text('AdMob Demo'),),
     body:  Center(
       child: Column(
        children: [
          const Text("AdMob Banner Ad Demo App"),
          ElevatedButton(onPressed: (){
            Navigator.pushNamed(context, '/main_content');
          }, child: const Text("Main Content"))
        ],

       ),
     ),
    );

  }

}
Let’s initialise Google MobileAds for Flutter
class MyApp extends StatelessWidget{
//...
Future<InitializationStatus> _initGoogleMobileAds()
  {
    return MobileAds.instance.initialize();
  }
}
The code snippet provided defines a function named _initGoogleMobileAds() that initializes the Google Mobile Ads SDK in a Flutter app and returns a Future object with the type InitializationStatus.
Future<InitializationStatus> This indicates that the function will return a Future object that holds an InitializationStatus value.
Complete code of main.dart
import 'package:flutter/material.dart';
import 'package:google_mobile_ads/google_mobile_ads.dart';
import 'package:banner_admob/main_content.dart';
void main() {
  runApp(
          MaterialApp(
            title:  'AdMob Banner Ad Demo',
            initialRoute:  '/',
            routes: {
              '/' : (context) =>  MyApp(),
              '/main_content' : (context) =>  MainContent(),
            },
          )
      );
}

class MyApp extends StatelessWidget{

  Future<InitializationStatus> _initGoogleMobileAds()
  {
    return MobileAds.instance.initialize();
  }
  Widget build(BuildContext context) {
    // TODO: implement build
    return Scaffold(appBar: AppBar(title: const Text('AdMob Demo'),),
     body:  Center(
       child: Column(
        children: [
          const Text("AdMob Banner Ad Demo App"),
          ElevatedButton(onPressed: (){
            Navigator.pushNamed(context, '/main_content');
          }, child: const Text("Main Content"))
        ],

       ),
     ),
    );

  }
}
Now time to run our app:
Press ^R or Ctrl+R
flutter admob demo app
![Flutter AdMob Integration Tutorial: Banner Ad [2023]](https://bigknol.com/wp-content/uploads/2023/07/admob-banner-flutter-example1-2.png)

Happy Coding!!