
Flutter Splash Screen Without A Package: Is it possible?
Creating a Flutter splash screen in Dart is quite easy with some beautiful packages. However, if you need a minimal look and better performance, you can build a Flutter splash screen without a package. In this tutorial, we’ll explore how to quickly build a Flutter splash screen without using a package.
A splash screen serves as the initial visual that users encounter when they launch a mobile application. It sets the tone for the user experience, offering a glimpse into what awaits them within the app. Designing a captivating splash screen can significantly enhance the overall impression of your application.
To create a splash screen in Flutter, developers typically start by designing a visually appealing layout using widgets such as Container, Image, or Text. These widgets allow for the incorporation of branding elements, logos, or animations that reflect the essence of the application.
Next, developers implement logic to control the duration of the splash screen using Flutter’s Timer class or other animation techniques. This ensures that the splash screen is displayed for an optimal amount of time, providing users with a seamless transition to the main content of the application.
Here, we create a splash screen that waits for 6 seconds before transitioning to the Home screen. To simulate this delay, we utilize the Future class with Duration.
 Future.delayed(const Duration(seconds: 6), () {
      Navigator.of(context).pushReplacement(
          MaterialPageRoute(builder: (context) => const Home()));
    });

main.dart
Open DartPad and write the following code and run it.
import 'package:flutter/material.dart';
void main() {
runApp(const FlightInfoApp());
}
class FlightInfoApp extends StatelessWidget {
const FlightInfoApp({super.key});
@override
Widget build(BuildContext context) {
return const MaterialApp(
home: SplashScreenWidget(),
);
}
}
class SplashScreenWidget extends StatefulWidget {
const SplashScreenWidget({super.key});
@override
State<SplashScreenWidget> createState() => _SplashScreenWidgetState();
}
class _SplashScreenWidgetState extends State<SplashScreenWidget> {
@override
void initState() {
super.initState();
Future.delayed(const Duration(seconds: 6), () {
Navigator.of(context).pushReplacement(
MaterialPageRoute(builder: (context) => const Home()));
});
}
@override
Widget build(BuildContext context) {
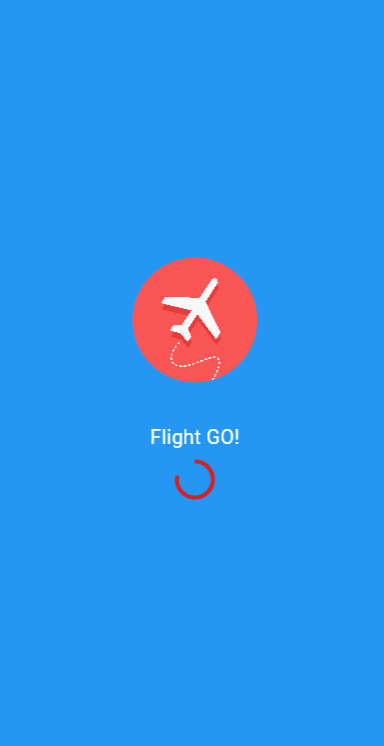
return Scaffold(
backgroundColor: Colors.blue,
body: Center(
child: Column(
mainAxisAlignment: MainAxisAlignment.center,
children: [
ClipOval(
child: Image.network(
'https://cdn.pixabay.com/photo/2023/10/28/05/54/plane-8346567_1280.png',
width: 125, // Set width
height: 125, // Set height
fit: BoxFit.cover,
),
),
const SizedBox(
height: 40,
),
const Text(
'Flight GO!',
style: TextStyle(
fontSize: 20,
fontWeight: FontWeight.w100,
color: Colors.white),
),
const SizedBox(
height: 10,
),
const CircularProgressIndicator(
valueColor: AlwaysStoppedAnimation<Color>(
Color.fromARGB(255, 219, 30, 30)),
),
],
),
),
);
}
}
class Home extends StatelessWidget {
const Home({super.key});
@override
Widget build(BuildContext context) {
return Scaffold(
appBar: AppBar(title: const Text('Flight GO!')),
body: Center(child: const Text('Welcome to Flight GO!')));
}
}
Additionally, developers may utilize packages like flutter_native_splash to generate platform-specific splash screen configurations for Android and iOS, ensuring consistency across different devices and screen resolutions.
Should I Use Future?
Using a Future delay for a splash screen in Flutter can be a valid approach, especially if you want to introduce a delay before transitioning to the main content of your application. However, it’s essential to consider the overall user experience and whether a delay adds value or detracts from it.
A Future delay can be beneficial in scenarios where you need to perform initialization tasks or fetch data before presenting the main screen. For example, you might use it to load assets, initialize services, or fetch user preferences from a local database or remote server.