Flutter App from Scratch: Let’s Create a Dog Breed Info App
I know you’re eager to build a Flutter app from scratch. It’s genuinely enjoyable to create an app that can showcase relevant information for everyone. We’re not just making the old-fashioned ‘Hello, World‘ stuff. Isn’t that boring, huh?
Building an app from scratch can be a daunting task for absolute beginners, so we’ve decided to start with a simple Flutter app that is also quite useful. Yes, just a bit!
Do you love dogs? If so, you are definitely going to love this app that you will build through this tutorial.
You know, there are 360+ dog breeds available. Sounds great! Let’s build a Flutter app that can display information about various dogs.


When it comes to building an app in Flutter, the primary consideration is which Integrated Development Environment (IDE) to use. Android Studio and VS Code are both available for Flutter development. Which one is best for you?
If your computer is not performing as fast as expected with Android Studio, I would definitely recommend using VS Code
This tutorial will not guide you through the process of downloading and setting up your environment for Flutter development; the main focus is on building an app in Flutter.
Prerequisite Reading for this Tutorial (Optional)
Step 1: Create a flutter app
Creating an app in VS Code is pretty straightforward. Make sure you have Flutter and Dart installed on your machine before starting.
Open VS Code and Create a new Flutter project
Click on the “View” option in the top menu and Select “Command Palette” ( Use Ctrl+Shift+P or Shift + Command + P (Mac) )
Start typing ‘>‘ to Create a new flutter project. (Select Flutter: New Project) then Select Application
Give a name for your project.
Step 2: Bring some assets
Let’s bring some images for our Dog Breed Info App. You can find free images from the following links.
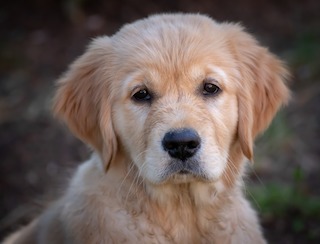


Add these images to your project’s assets folder. (assets /images)
If you don’t have an ‘assets‘ folder, just create new folder in your top project hierarchy.
For adding images to a Flutter project, the following link will be helpful if you find the process confusing.
Displaying images in Flutter app
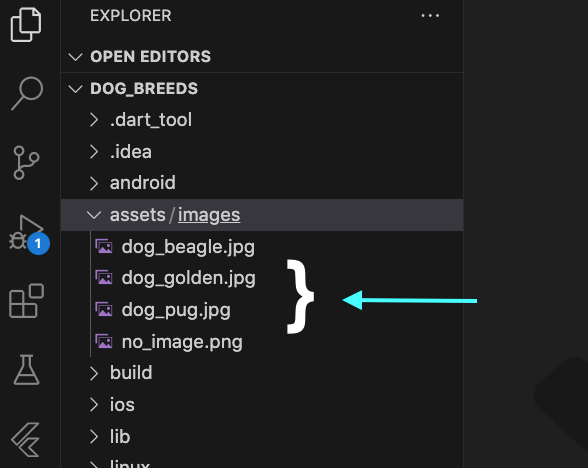
As you can see, we have successfully stored our images inside our ‘assets/images’ folder. The next step is to inform our YAML file to use these images. YAML files are very sensitive; placing even a single space can cause an error. So, be careful with YAML indentation. Check the following image for an understanding of how these image references are being placed.

Step 3 : Write some code
The root of your application code might look like below. We write everything inside our main.dart file.
import 'package:flutter/material.dart';

void main() {
  runApp(const MyApp());
}

class MyApp extends StatelessWidget {
  const MyApp({super.key});

  // This widget is the root of your application.
  @override
  Widget build(BuildContext context) {
    return MaterialApp(
      title: 'Dog Breeds',
      theme: ThemeData(
        colorScheme: ColorScheme.fromSeed(seedColor: Colors.deepPurple),
        useMaterial3: true,
      ),
      home:  DogBreedList(),
    );
  }
}
I got an error by obeying you flawlessly! DogBreedList()
Stay calm; we’re about to create a class named ‘DogBreedList‘ that will assist in loading our dog names and their characteristics. This class will be a StatelessWidget.
List:
 final List<String> dogBreeds = [
   "Pug",
   "Beagle",
   "Golden Retriever",
   "Tibetan Mastiff"
];Map:
final Map<String, String> dogInfo = {
    'Beagle': 'Beagles are curious, friendly, and great with kids. They have a strong sense of smell and were originally bred for hunting.',
    'Pug' : 'Smart and Playful',
    'Golden Retriever': 'Golden Retrievers are friendly, intelligent, and devoted. They make excellent family pets.',

  };
DogBreedList Class :
class DogBreedList extends StatelessWidget{
  DogBreedList({super.key});

  final List<String> dogBreeds = [
   "Pug",
   "Beagle",
   "Golden Retriever",
   "Tibetan Mastiff"
  ];


  final Map<String, String> dogInfo = {
    'Beagle': 'Beagles are curious, friendly, and great with kids. They have a strong sense of smell and were originally bred for hunting.',
    'Pug' : 'Smart and Playful',
    'Golden Retriever': 'Golden Retrievers are friendly, intelligent, and devoted. They make excellent family pets.',

  };


  @override
  Widget build(BuildContext context) {

     return Scaffold(appBar: AppBar(
      title: const Text('Dog Breed List'),

     ),
     body: ListView.builder(
      itemCount: dogBreeds.length,
      itemBuilder: (context, index){
        return ListTile(
          title: Text(dogBreeds[index]),
          onTap: (){
            Navigator.push(
              context, MaterialPageRoute(
                builder: (context) => DogBreedDetails(breed: dogBreeds[index], info: dogInfo[dogBreeds[index]] ?? 'No Information Available',))
            );
          },
        );
      },
     ),
     );

  }
}
Step 4: Build a Second Screen in Flutter
When a dog list item (in this case, dog names) is touched or clicked, the app should display another screen containing details about the selected dog.
DogBreedDetails Class :
class DogBreedDetails extends StatelessWidget{
  final String breed;

  final String info;

  const DogBreedDetails({super.key, required this.breed, required this.info});

  String getImagePath() {
    switch(breed.toString())
    {
      case 'Pug':
        return 'assets/images/dog_pug.jpg';
      case 'Beagle':
        return 'assets/images/dog_beagle.jpg';
      case 'Golden Retriever':
         return 'assets/images/dog_golden.jpg';
      default:
      return 'assets/images/no_image.png';
    }
  }

  @override
  Widget build(BuildContext context) {
    return Scaffold(
      appBar: AppBar(title: const Text('Breed Details'),),
      body: Center(child: Column(children:
       [
        Text('Breed : $breed', style: const TextStyle(fontSize: 20),),
        const SizedBox(height: 20,),
        Image.asset(
         getImagePath(),
         height: 200,
         width: 200,
         fit: BoxFit.cover,
        ),
        const SizedBox(height: 20,),
        Padding(padding: const EdgeInsets.all(20),
        child: Text('About : $info', style: const TextStyle(fontSize: 16),))

       ]
      )),
    );
  }

}
The dog information is sent through the MaterialPageRoute from DogBreedList.
Navigator.push(
              context, MaterialPageRoute(
                builder: (context) => DogBreedDetails(breed: dogBreeds[index], info: dogInfo[dogBreeds[index]] ?? 'No Information Available',))
            );
Here, the getImagePath() method is utilized to locate the images corresponding to the dog’s names.
main.dart (Completed)
import 'package:flutter/material.dart';

void main() {
  runApp(const MyApp());
}

class MyApp extends StatelessWidget {
  const MyApp({super.key});

  // This widget is the root of your application.
  @override
  Widget build(BuildContext context) {
    return MaterialApp(
      title: 'Dog Breeds',
      theme: ThemeData(
        colorScheme: ColorScheme.fromSeed(seedColor: Colors.deepPurple),
        useMaterial3: true,
      ),
      home:  DogBreedList(),
    );
  }
}

class DogBreedList extends StatelessWidget{
  DogBreedList({super.key});

  final List<String> dogBreeds = [
   "Pug",
   "Beagle",
   "Golden Retriever",
   "Tibetan Mastiff"
  ];


  final Map<String, String> dogInfo = {
    'Beagle': 'Beagles are curious, friendly, and great with kids. They have a strong sense of smell and were originally bred for hunting.',
    'Pug' : 'Smart and Playful',
    'Golden Retriever': 'Golden Retrievers are friendly, intelligent, and devoted. They make excellent family pets.',

  };


  @override
  Widget build(BuildContext context) {

     return Scaffold(appBar: AppBar(
      title: const Text('Dog Breed List'),

     ),
     body: ListView.builder(
      itemCount: dogBreeds.length,
      itemBuilder: (context, index){
        return ListTile(
          title: Text(dogBreeds[index]),
          onTap: (){
            Navigator.push(
              context, MaterialPageRoute(
                builder: (context) => DogBreedDetails(breed: dogBreeds[index], info: dogInfo[dogBreeds[index]] ?? 'No Information Available',))
            );
          },
        );
      },
     ),
     );

  }
}

class DogBreedDetails extends StatelessWidget{
  final String breed;

  final String info;

  const DogBreedDetails({super.key, required this.breed, required this.info});

  String getImagePath() {
    switch(breed.toString())
    {
      case 'Pug':
        return 'assets/images/dog_pug.jpg';
      case 'Beagle':
        return 'assets/images/dog_beagle.jpg';
      case 'Golden Retriever':
         return 'assets/images/dog_golden.jpg';
      default:
      return 'assets/images/no_image.png';
    }
  }

  @override
  Widget build(BuildContext context) {
    return Scaffold(
      appBar: AppBar(title: const Text('Breed Details'),),
      body: Center(child: Column(children:
       [
        Text('Breed : $breed', style: const TextStyle(fontSize: 20),),
        const SizedBox(height: 20,),
        Image.asset(
         getImagePath(),
         height: 200,
         width: 200,
         fit: BoxFit.cover,
        ),
        const SizedBox(height: 20,),
        Padding(padding: const EdgeInsets.all(20),
        child: Text('About : $info', style: const TextStyle(fontSize: 16),))

       ]
      )),
    );
  }

}
Step 5 : Run your app
Congratulations on your patience and eagerness to build a Flutter app from scratch.
You did it.


In conclusion, building an app from scratch is a daunting process, as it may involve encountering some unknown errors upon closer inspection. A production-ready app requires a considerable amount of work and testing before being handed over to users.