Stack in Flutter : A Cool Widget for Stacking UI Components
Most apps rely on UI components or elements to aid user interaction. Placing and arranging UI elements or widgets in Flutter proves to be a relatively simple task. Nevertheless, there are instances where rendering complex UI with multiple stacked items becomes necessary. In such cases, we employ the stack in Flutter —a highly effective widget for layering UI elements atop one another.
Why should we use Stack in Flutter?
Arrange widgets on top of a base widget, typically used with images, using Stack. The widgets can overlap the base widget either partially or completely.
The Advantages of Stack Widgets Include:
1. Utilize this for situations where widgets are placed in a manner that they overlap with other widgets on the screen.
2. The initial widget listed among the children serves as the base, while subsequent children overlay on top of this base widget.
3. Content within a Stack cannot be scrolled.
4. You have the option to clip children that extend beyond the render box.
How to create a Stack Widget?
You simply use the Stack widget as the parent and add different widgets as its children. Position these children relative to the boundaries of the Stack.
Stack(
  children: <Widget>[
    // Bottom widget
    Container(
      color: Colors.blue,
      height: 200,
      width: 200,
    ),
    // Middle widget
    Positioned(
      top: 50,
      left: 50,
      child: Container(
        color: Colors.red,
        height: 100,
        width: 100,
      ),
    ),
    // Top widget
    Positioned(
      top: 100,
      left: 100,
      child: Container(
        color: Colors.green,
        height: 100,
        width: 100,
      ),
    ),
  ],
)
Let’s create a flutter app for demonstrating the Stack widget:
main.dart file
import 'package:flutter/material.dart';

void main() {
  runApp(const MyApp());
}

class MyApp extends StatelessWidget {
  const MyApp({super.key});

  // This widget is the root of your application.
  @override
  Widget build(BuildContext context) {
    return MaterialApp(
      title: 'Flutter Demo',
      theme: ThemeData(

        colorScheme: ColorScheme.fromSeed(seedColor: Colors.deepPurple),
        useMaterial3: true,
      ),
      home: const MyHomePage(title: 'Flutter Demo Home Page'),
    );
  }
}

class MyHomePage extends StatefulWidget {
  const MyHomePage({super.key, required this.title});

  final String title;

  @override
  State<MyHomePage> createState() => _MyHomePageState();
}

class _MyHomePageState extends State<MyHomePage> {
  int _counter = 0;

  void _incrementCounter() {
    setState(() {
      _counter++;
    });
  }

  @override
  Widget build(BuildContext context) {

    return Scaffold(
      appBar: AppBar(

        backgroundColor: Theme.of(context).colorScheme.inversePrimary,

        title: Text(widget.title),
      ),
      body: Center(

        child: Column(
          mainAxisAlignment: MainAxisAlignment.center,
          children: <Widget>[
            const Text(
              'You have pushed the button inside the stack',
            ),
            Text(
              '$_counter',
              style: Theme.of(context).textTheme.headlineMedium,
            ),
             Stack(
              alignment: AlignmentDirectional.center,
              children: [
              Container(
                width: 300,
                height: 300,
                color: Colors.green,
              ),
              Container(
                width: 200,
                height: 200,
                color: Colors.amber,
              ),
              Container(
                width: 150,
                height: 150,
                color: Colors.blueAccent,
              ),
              ElevatedButton(onPressed: _incrementCounter, child: const Text("+"))

            ],)


          ],
        ),
      ),
      // This trailing comma makes auto-formatting nicer for build methods.
    );
  }
}
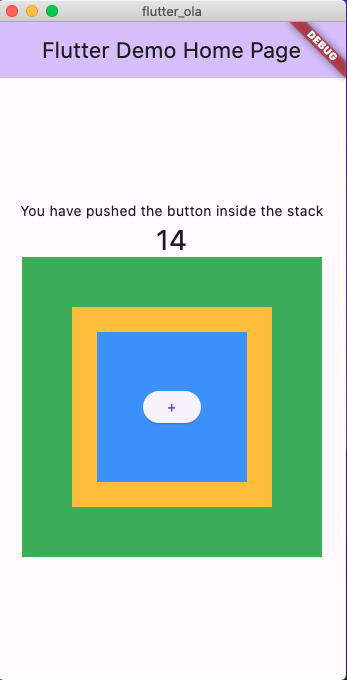
This code creates a stack of containers and a button in Flutter. The containers are placed on top of each other, and the button is also part of this stack.
The containers have different sizes and colors: a large green one at the bottom, an amber-colored one placed on top of the green container, and a smaller blue one on top of the amber container.
Also, the stack of containers includes an elevated button with a “+” sign. When pressed, it triggers the _incrementCounter function. The alignment property centers these widgets within the stack.